In order to be able to do so, you will have to the following:
- Create a Telegram public channel (we’ll make this private later)
- Create a Telegram BOT via BotFather
- Set the bot as administrator in your channel
After you’ve completed the steps above, we can now go ahead and send a message to the channel by issuing and HTTP GET request to the Telegram BOT API at the following URL (you can do this in your browser):
https://api.telegram.org/bot[BOT_API_KEY]/sendMessage?chat_id=[CHANNEL_NAME]&text=[MESSAGE_TEXT]
where:
BOT_API_KEY is the API Key generated by BotFather when you created your bot
CHANNEL_NAME is the handle of your public channel (e.g. @channel_name)
MESSAGE_TEXT is the message you want to send (URL-encoded)
Example HTTP API call response:
{
  "ok": true,
  "result": {
    "message_id": 2,
    "chat": {
      "id": -1001363941800,
      "title": "TestChannel",
      "username": "usefulmix_channel",
      "type": "channel"
    },
    "date": 1538926255,
    "text": "Test message"
  }
}
So far, so good, but let’s consider that you’ll want this new channel to be private so that only you and the bot (and whoever you decide to invite in the channel) will see the messages.
So we need to make the channel private, however in doing so our above HTTP API call will stop working and this is what trying to prublish a message will look like:
{
  "ok": false,
  "error_code": 400,
  "description": "Bad Request: chat not found"
}
To get around this, all you need to do is look at the public HTTP API call we made initially and pick up the "id": -1001363941800 as this is the unique id of our channel which we’ll be switching to after we make our channel private from public.
So now the API call becomes:
https://api.telegram.org/bot[BOT_API_KEY]/sendMessage?chat_id=-1001363941800&text=[MESSAGE_TEXT]
And voila, you now have a private Telegram channel, where you can send messages via the HTTP bot sendMessage API. This can be very useful when you have some online services that provide you with a callback mechanism and can call you HTTP API endpoint so that you get notified of whatever in real time.
]]>Provided you have SSH access to your server, run the following set of commands and this will likely fix your issue.
Reset all file permissions 664:
find /path/to/site/ -type f -exec chmod 664 {} \;
Reset all directory permissions to 775:
find /path/to/site/ -type d -exec chmod 775 {} \;
Reset the group ownership to the wordpress or www-data group (or whatever your nginx/apache group name is):
chgrp -R wordpress /path/to/wodpress_site_directory/
After you run these commands you should be able to successfully update WordPress code, plugins and themes with no issues.
]]>
- Accessible buttons and cutouts around speakers, camera, and charging port.
- Shock-absorbing TPU
- Rigid back with protection against scratches and scrapes
- Slim profile
- Comfortable grip when held in the palm of your hands.
- Transparent body
]]>
Currently the stable version is version 2.3.5, and I wanted to go with the 3.0.1 experimental version, and here’s how to do just that:
1. Go to the Archidroid’s github repository: i9300-cm-experimental
2. And download the repository zip: direct download zip of i9300-cm-experimental
3. After the download is finished, unzip the archive.
4. Download 7zip from here: 7zip.org
5. After you’ve extracted the i9300-cm-experimental zip archive, go into the directory, select everything (Ctrl+A shortcut) and right click and select 7zip > Add to archive… and select Compression Level: Fastest and the Compression method: Deflate and click ok.
6. After the zip archive has been created, copy it to your device.
7. Next, just reboot your GS3 into recovery console and flash the .zip archive like any other rom.
A short video available on the Archidroid thread which shows some of the steps mentioned above:

In the repository action bar, click Settings.

Under Danger Zone, click Delete this repository.

Read the warnings.
To verify that you’re deleting the correct repository, type the name of the repository you want to delete.

Click I understand the consequences, delete this repository.
]]>
BMI Calories is a small index off free health and fitness calculators mainly designed to be universally applicable for worldwide usage (each one has a metric system and a standard US measuring system).
The above picture is a screenshot of the interactive geo-chart-map, which displays the average BMI values in 177 countries for both men and women and can be found on the bmi calculator page.
Other calculators available on the site:
- BMR calculator – for figuring out your basal metabolic rate (or resting metabolic rate, as it is sometimes referred to)
- A Calorie intake calculator – for figuring out how many calories a day the body requires depending on the physical activity level you undergo. The nice thing about it is that it also has a section with a table of physical activities that span over ~300 or so different types of activities and their associated calorie consumption / expenditure values.
- Body Fat percentage calculator – the name says it all, however what’s nice about it is that, aside from the actual body fat percentage value calculated, it also provides some insights into fat and lean mass, body adiposity index (also known as BAI), and a value of the body fat extracted using the BMI – for adults and children alike.
Like with the interesting information from the global average BMI, all other calculators come with a plethora of additional information related to the actual calculation, which makes it a great resource for whenever you need to calculate these values, but also have some time to browse around.
]]>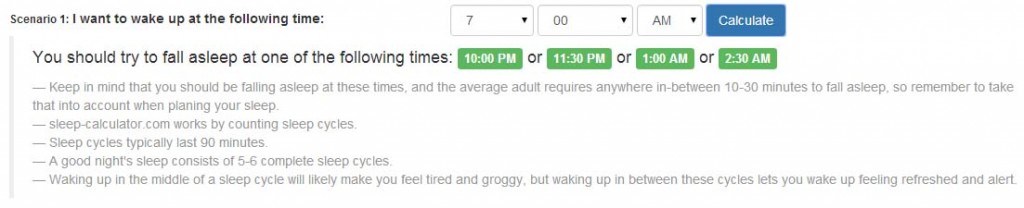
Waking up refreshed and comfortable consists of getting to bed at the right time. Sleep-calculator.com is a webapp that makes decisions based on our sleep cycles and calculates when you should fall asleep / wake up.
Punch in when you need to wake up and you’ll get 4 best times to fall asleep.
Other scenarios are available as well:
- Depending on your situation you might want to know when to go to sleep to wake up at a specified time (in this case go for Scenario 1)
- You might want to decide the best times to wake up after having gone to sleep at a specified time (in this case go for Scenario 2)
- You might want to simply know the best times to wake up if you were to go to sleep this instant (in this case go for Scenario 3)
- If plan to take a power nap it will give you the best time at which you should wake up (in this case go for Scenario 4)
Give it a try to see if you can time your sleep for the best rest.
]]>Add ‘client_max_body_size xxM’ inside the server section, where xx is the size (in MB) that you want to allow for files upload to your webserver.
The client_max_body_size directive assigns the maximum accepted body size of client request, indicated by the line Content-Length in the header of request.
To edit your nginx configuration, in your terminal type the following:
sudo nano /etc/nginx/nginx.conf
or
sudo nano /usr/local/nginx/conf/nginx.conf
and set the
# set client body size to 2M #
client_max_body_size 2M;
as per the example below:
http {
include mime.types;
default_type application/octet-stream;
sendfile on;
keepalive_timeout 65;

server {
client_max_body_size 2M;
listen 80;
server_name localhost;

# Main location
location / {
proxy_pass http://127.0.0.1:8000/;
}
}
}
]]>The package could not be installed. PCLZIP_ERR_BAD_FORMAT (-10) : Unable to find End of Central Dir Record signature
This is because I’m trying to unpack a .rar archive and the server doesn’t have rar archive support installed, however you can get around this issue quite easily.
All you need to do is unpack the .rar archive and re-pack it as a .zip archive and re-try the upload. Everything will work as expected after that.
]]> git branch -d some_example_local_branch
Git – delete/remove a remote branch:
git push origin : some_example_remote_branch
In case of error after trying to remove remote branch, run:
git fetch -p
This is what the error message would look like:
 error: unable to push to unqualified destination: some_example_remote_branch

The destination refspec neither matches an existing ref on the remote nor

begins with refs/, and we are unable to guess a prefix based on the source ref.

error: failed to push some refs to 'git@repository_name'
and this is caused due to the fact that perhaps anyone else has already deleted the branch and you need to synchronize your branch list.
]]>